Render HTML tree from flat array structure

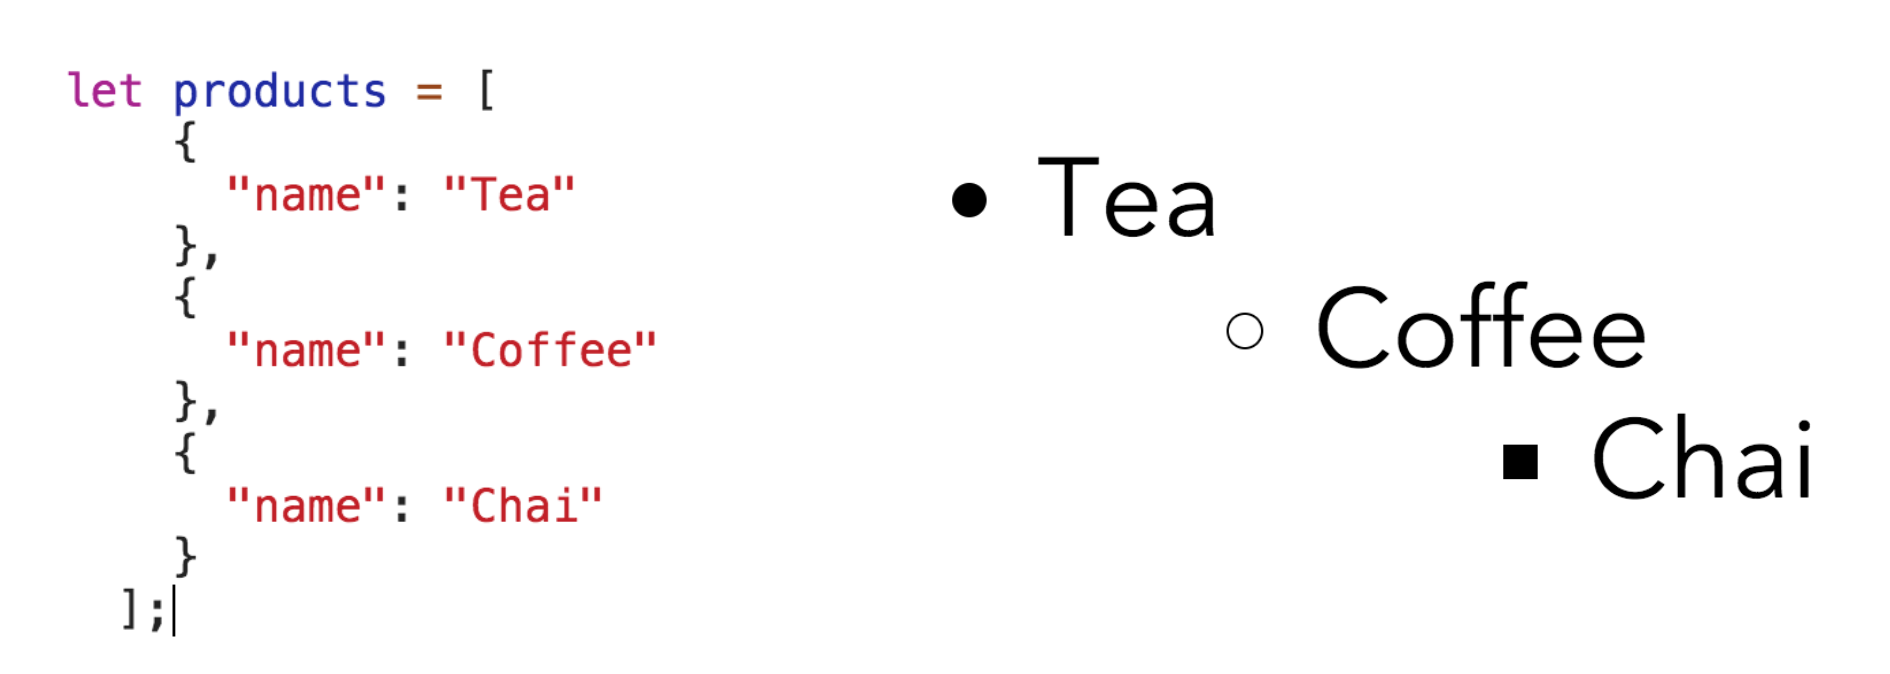
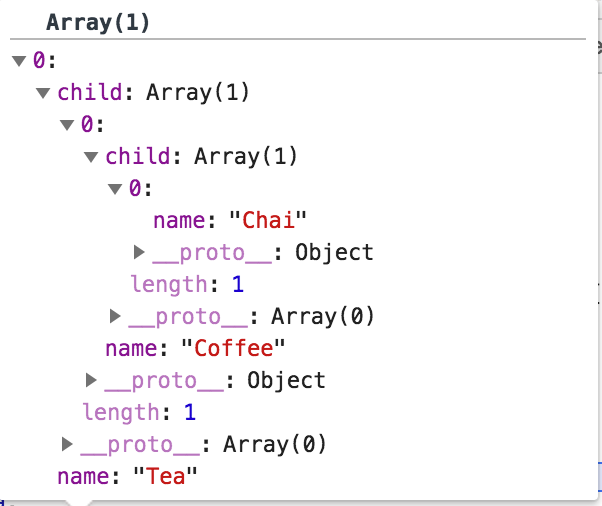
First step is to convert flat array into Hierarchy

const hierarchy = products.reduceRight((child, obj) => {
 if (child) {
  return [Object.assign({}, obj, { child })];
 }
 return [obj];
 }, null);

This will return


const renderHierarchy = child => child.map(hierarchy => (
 <Node node={hierarchy}>
 {hierarchy.child}
 </Node>
));

Node.jsx

import React from ‘react’;
import PropTypes from ‘prop-types’;
const propTypes = {
 children: PropTypes.array,
 node: PropTypes.object,
};
const defaultProps = {
 children: null,
 node: <div />,
};
export default function Node({ children, node }) {
 let childnodes = null;
// the Node component calls itself if there are children
 if (children) {
 childnodes = children.map(childnode => (
 <Node node={childnode} >
 {childnode.child}
 </Node>
 ));
 }
// return our list element
 // display children if there are any
 return (
 <li key={node.id}>
 <span>{node.name}</span>
 { childnodes ?
 <ul>{childnodes}</ul>
 : null }
 </li>
 );
}
Node.propTypes = propTypes;
Node.defaultProps = defaultProps;

Test your output

Note: This article was earlier published here


After.js + Styled components, The really simple guide

https://github.com/balramsinghindia/after.js/tree/example-with-afterjs-styled-component

I recently started using After.js and quite honestly, I have to say, After.js is an awesome tool. It gives you many out of the box features. Overall it is one of the perfect solutions for server-side rendering.

Styled component is a full, scoped and component-friendly CSS support for JSX (rendered on the server or the client), and while this is great, I rather use styled components, it’s just my preference.

After.js bundle has a basic example of server-side rendering but that does not include implementation of Styled components.

This guide will explain step by step implementation of styled component on top of the example given in After.js bundle.

Step 1: Run example of After.js

yarn global add create-razzle-app
create-razzle-app --example with-afterjs myapp
cd myapp
yarn start

Step 2: Add Styled components in the package.json dependency list

yarn add styled-components --save

Step 3: Create the custom Documents.js file

// ./src/Document.js
import React from 'react';
import { ServerStyleSheet } from 'styled-components'
import { AfterRoot, AfterData } from '@jaredpalmer/after';
export default class Document extends React.Component {
  static async getInitialProps({ assets, data, renderPage }) {
    const sheet = new ServerStyleSheet()
    const page = await renderPage(App => props => sheet.collectStyles(<App {...props} />))
    const styleTags = sheet.getStyleElement()
    return { assets, data, ...page, styleTags};
  }
render() {
    const { helmet, assets, data, styleTags } = this.props;
    // get attributes from React Helmet
    const htmlAttrs = helmet.htmlAttributes.toComponent();
    const bodyAttrs = helmet.bodyAttributes.toComponent();
return (
      <html {...htmlAttrs}>
        <head>
          <meta httpEquiv="X-UA-Compatible" content="IE=edge" />
          <meta charSet="utf-8" />
          <title>Hi, Welcome to the Afterparty</title>
          <meta name="viewport" content="width=device-width, initial-scale=1" />
          {helmet.title.toComponent()}
          {helmet.meta.toComponent()}
          {helmet.link.toComponent()}
          {/** here is where we put our Styled Components styleTags... */}
          {styleTags}
        </head>
        <body {...bodyAttrs}>
          <AfterRoot />
          <AfterData data={data}/>
          <script
            type="text/javascript"
            src={assets.client.js}
            defer
            crossOrigin="anonymous"
          />
        </body>
      </html>
    );
  }
}

Step 4: Edit src/server.js

// ./src/server.js
import express from 'express';
import { render } from '@jaredpalmer/after';
import routes from './routes';
import MyDocument from './Document';
const assets = require(process.env.RAZZLE_ASSETS_MANIFEST);
const server = express();
server
  .disable('x-powered-by')
  .use(express.static(process.env.RAZZLE_PUBLIC_DIR))
  .get('/*', async (req, res) => {
    try {
      const html = await render({
        req,
        res,
        document: MyDocument,
        routes,
        assets,
        // Anything else you add here will be made available
        // within getInitialProps(ctx)
        // e.g a redux store...
        customThing: 'thing',
      });
      res.send(html);
    } catch (error) {
      console.error(error);
      res.json({ message: error.message, stack: error.stack });
    }
  });
export default server;

Step 5: Let’s edit examples/basic/src/home.js

// ./src/home.js
import React, { Component } from 'react';
import logo from './react.svg';
import { Link } from 'react-router-dom';
import styled from 'styled-components';
class Home extends Component {
  static async getInitialProps({ req, res, match, history, location, ...ctx }) {
    return { stuff: 'whatevs' };
  }
  render() {
    console.log(this.props);
    return (
        <SampleStyledComponent className="Home">
          <div className="Home-header">
            <img src={logo} className="Home-logo" alt="logo" />
            <div>Welcomse to After.js</div>
          </div>
          <p className="Home-intro">
            To get started, edit
            <code>src/Home.js</code> or <code>src/About.js</code>and save to
            reload.
          </p>
          <Link to="/about">About -></Link>
       </SampleStyledComponent>
    );
  }
}
export default Home;
const SampleStyledComponent = styled.div`
  color: red;
`;

Result: Test new CSS in http://localhost:3000/

Feel free to question in the comment section in case of an issue.

Reference:

https://github.com/jaredpalmer/after.js

Note: This article was previously published here
Role of 3rd Pin of Electric Plug In Your Growth

Generally two pin plug is used to run small electronic gadgets like fan, tube-light, mobile charger. What is the role of these two pins in your growth.

1st Pin – Live Current Wire – Your Hard Work

In Electric plug, first and most important pin is live current wire which produces Power. If Power is not there, you can’t run any electronic item and to get this power, you have to pay.

In real life this Power Pin is your Hard Work. If you want to achieve your goal you have to work for it.

2nd Pin – Neutral Wire – Your Luck

You do not have to pay for Neutral in electric plug but if Power is there and Neutral is not there then you can not run your electronic item. So Neutral costs nothing but is mandatory.

In same way, You do not have to work for your luck. No matter how hard you work and your luck is not with you, You can not get what you want like something unusual happens and you could not achieve your goal even when you deserve it.

But also I’ve found that luck is quite predictable. Take more chances, Be more active, Show up more often and you will get more luck.

When you have to run any electronic gadget, You need both positive wire which is Power and negative wire which is Neutral. Similarly both Hard Work and luck is required to get any thing in your life.

3rd Pin – Earth Wire – Guidance of Great People

To run comparatively big appliances like refrigerator, A.C, television, three pin plug is used, that extra 3rd pin is Earth Wire which is not mandatory for small gadgets but is used to run bigger metallic appliances and it helps to open sockets and protects from shocks.

In real life, If you want to grow exceptionally, you can also add that third pin in your life which is nothing but the guidance of successful people who can help you to find new opportunities and protect you from going in wrong direction.

For example, you want to be a good photographer and you add guidance of a photographer who has already reached heights in this profession and he knows all the ways to click a very good photo and very bad photo and you are using his experiences in your profession, then definitely you can become a good photographer in very less time.


Note: This article was previously published here
Create REST APIs with swagger and strong-loop

Gone are the days when you needed to write code and develop REST API to share detailed documentation with end Users.

Now is the time when we can visualize and design and even interact with the API’s resources without having any of the implementation logic in place.

Good to start with. And the icing on the cake is that we can generate the implementation code in more than 25 programing languages based on above design specs.

Welcome to swagger editor.

It allows you to edit, define and simultaneously visualize the behavior of your REST APIs before they are even developed.

Benefit in going this way is that you can keep changing the contract quickly until it gets finalized and then you can start real development. This tool can be used as boiler plate before starting a new project in the language of your choice.

If you wish to develop them using strong-loop, you can get a quick-start using loopback:swagger. (You don’t need below steps for other than strong-loop)

Below are the steps:

  1. install loopback
  2. Run below in terminal
    • slc loopback:swagger
  3. What’s the name of your application? swagger-loop
    • Which version of LoopBack would you like to use? 2.x (long term support)
    • What kind of application do you have in mind? ❯ empty-server
  4. npm i loopback-swagger
  5. cd swagger-loop
  6. File –> convert and save as json from below URL
    • https://editor.swagger.io/
  7. save the above json as swagger.json (or any name of your choice)
  8. slc loopback:swagger
  9. Enter the swagger spec url or file path: swagger.json
  10. Successful completion of above command should generate the strongloop code for the API based on the swagger specification defined in the swagger.json

References:

https://loopback.io/doc/en/lb3/Swagger-generator.html

https://docs.strongloop.com/display/public/LB/Swagger%20generator

https://www.npmjs.com/package/loopback-swagger

Co-Authored by:

Balram Singh

Note: This Article was earlier posted at

https://www.linkedin.com/pulse/create-rest-apis-swagger-strong-loop-narendra-mandiwal/

Bitter truths of corporate management

  • Threat is used more often than rewards to get more productivity.
  • Long term growth of employees is never a goal for management.
    • Any effort towards growth of employee is nothing more than a necessary evil and is ignored as much as possible.
  • Managers try to suppress growth of immediate subordinates out of sense of insecurity and competition.
    • Degree of honesty & accuracy in ‘supporting growth’ of an employee is directly proportional to the gap in seniority level between manager and employee.
  • Never share personal goals or future plans with management.
    • All such information will always be used against you to extract more out of you while paying less.
  • There is zero respect for the loyalty.
    • Your existence depends only on the fact that your replacement will be costlier than you.

Note: This may not be true for 100% organizations and are based on personal observations.

Ref:  https://www.linkedin.com/pulse/bitter-truths-corporate-management-narendra-mandiwal/